Nothing better to eat your own dog food to understand how you need to improve your tool to better serve your customers. At Xatkit, we have started to create a number of bot projects (including the very friendly Xat that you see on our home page). This helped us to realize that our current bot definition language had to undergo a major change if we wanted to:
- Simplify the creation of bots requiring complex conversational flows.
- Maximize the reusability opportunities, advancing towards creating bots by reusing building blocks and conversation paths already defined in the past
This wasn’t easy in the “old language version” as the intents definition was mixed with partial order constraints to restrict the freedom in the conversation path. That was enough when dealing with “open” bots (FAQ style bots) where most of the questions are independent and are always available but not when dealing with more “closed” bots where the potential conversations are much more restricted (think of a bot to order food from a website).
To bring the capabilities of our chatbot definition language to the next level we have moved to a DSL closer to state machine semantics and completely decoupled the intent definition from the transition rules that control what intents are available at any given point of the bot execution. This brings the following key benefits:
- You can now reuse previous intents in new bots even if the new bot is implementing different conversation paths.
- You can use all the power of the state machine formalism to define very complex conversation flows while keeping a clear and precise semantics for the bot.
- Create very complex guards in transitions. Move the bot to a new state based on the user input, coming events but also conditions on previous data, parameters of the conversation,…
- Place complex conversation logic to respond to user requests using the state body.
- Modularize the bot. Reuse parts of the state machine in other bots.
- Possibility to define local fallbacks as part of the state behaviour. Beyond a default global fallback, you can now attach local fallbacks to states that let you handle errors within the state context (e.g. to show a message helping the user to respond to the question posed by the bot in the specific state the conversation is in).
Convinced already?. Great!. Let us show a glimpse of what the new language looks like. NOTE: keep in mind that we have recently released a new Fluent API for the definition of the bots that keeps the same semantics explained here but use a different syntax as the one in the examples below. See this post for more information on the new language syntax.
Intent definition language
The intent definition remains a separate sublanguage but now even more decoupled from the execution part. Now, for each intent, we just define the set of training sentences for the intent and collect the parameters from the user utterance we want to save with the intent.
See the following example where we have a simple bot that just recognizes two types of user utterances (greetings and stating the name):
intent Hello {inputs {"Hi""Hello"}}intent MyNameIs {inputs {"My name is NAME""I'm NAME""Call me NAME"}creates context Greetings {set parameter name from fragment "NAME" (entity any)
}}
For each intent, we show a couple of training sentences to teach the bot how to recognize them. Moreover, see how we collect the NAME parameter in a context to use it later on (e.g. to answer the user in a more personalized way).
At this point, we are not stating what intent the bot should try to match first, this is something that belongs to the execution DSL we’re going to see just next. This enables us to reuse the intents (for example, in another bot where we may also need to ask for the user’s name but not just after a greeting intent).
Execution definition language
The execution file now defines a state machine that describes both the bot reactions to the intents/events and the potential transitions between them. Bot designers can now look at the execution file and have an idea of the entire conversation flow.
- Body (optional): the bot reaction, executed when entering the state.
- Next (mandatory): the outgoing transitions defined as condition –> State. The conditions are evaluated when an event/intent is received, and if a transition is navigable the execution engine moves to the specified state (and executes its body, etc). Note that transition conditions can be as complex as you want. And they are real guards, meaning that if the entire condition is not true the transition is not navigable, and the engine will stay in the same state.
- Fallback (optional): local fallbacks made easy. This section can contain arbitrary code (as the Body section) that will be executed if the engine cannot find a navigable transition.
- Init: a regular state that is entered when the user session is created. It can contain a Body, Next, and Fallback section.
- Default_Fallback: a state that can only contain a Body section, and cannot be the target of a transition. This state represents the default fallback code to execute when there is no local fallback defined in a state. This state can be used to print a generic error message (“Sorry I didn’t get it“), while local fallback can print a custom message tailored to the current state (“Please reply by yes or no“).
Finally, states can define a single wildcard transition (using the reserved character _ as the transition condition) that will be automatically navigated when the state’s body has been computed. This allows us to modularize the execution logic and reuse the same code in multiple places. See the detailed example below that shows a simple bot that just replies to the Hello intent above, asks for the user name and says hello to her (this example bot is supposed to be displayed via our React-based chat widget):
//We can always have an init state in case we need to initialize some bot parameters (e.g. welcoming message)Init {Next {//Here we state that the bot will first listen for an utterance matching the Hello intent, it will ignore anything elseintent == Hello --> HandleHello
}}HandleHello {Body {ReactPlatform.Reply("Hi, what's your name?")
}Next {//We wait for the user to input the name, no other transition is possible at this point//Obviously, in more complex bots we may have several possible outgoing transitions in a given stateintent == MyNameIs --> HandleMyNameIs
}}HandleMyNameIs {Body {ReactPlatform.Reply("Hi " + context.get("Greetings").get("name"))
}Next {// An automatic transition to the Init state since at this point the conversation is finished and we can start again_ --> Init
}}// Default Fallback state could go here
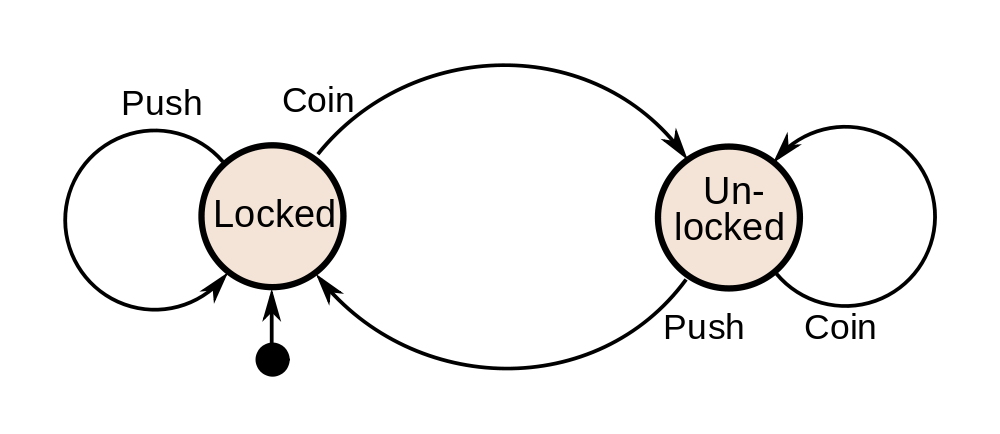
Graphical rendering
It’s also possible to take these textual descriptions and derive from them a graphical representation of the state machine, combining the best of both worlds: textual + graphical notations.
I hope you are as excited as we are with this new version of the language. And we are grateful to language version 1 to have been a wonderful learning tool to understand what we needed to create a much better chatbot creation experience for you!.